Insert and resize pictures in Outlook for Windows
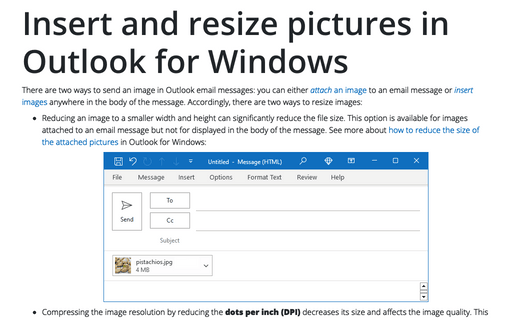
- Reducing an image to a smaller width and height can significantly reduce the file size. This option is available for images attached to an email message but not for displayed in the body of the message. See more about how to reduce the size of the attached pictures in Outlook for Windows:

- Compressing the image resolution by reducing the dots per inch (DPI) decreases its size and affects the image quality. This option is available for images that appear in the message body:

Note: Since each message you send is stored in your Sent Items folder, reducing the size of attachments can also help keep your mailbox size small. See how to turn off the saving copies of messages in the Sent Items folder for more details.
Add or insert pictures to an email message
To add a picture or insert pictures inline anywhere in the email body, in the Message window (in a new message, a reply, or a forwarded message), place the cursor in the message body, then:
- If you use the Simplified ribbon (see more about customizing ribbons), on the Insert tab, click the Pictures button, then choose one of the proposed options:

- Select Pictures... to choose an image stored on the local computer, laptop, shared locations, or connected network folder:

Select an image in the Insert Picture dialog box and click the Insert button.
Note: To insert more than one file, press and hold the Ctrl key while selecting multiple files.
- Select Stock Images... to choose Stock Images, Icons, Cutout People, Stickers, Illustrations, and Cartoon People from the stock image library:

Select one or several objects (see the number near the Insert label) and click the Insert button.
- Select Online Pictures... to find and insert images from the Internet:

Select one or a few objects (see the number near the Insert label) and click the Insert button.
- Select Pictures... to choose an image stored on the local computer, laptop, shared locations, or connected network folder:
- If you use the Classic ribbon, on the Insert tab, in the Illustrations group, click the Pictures button, then choose one of the options:
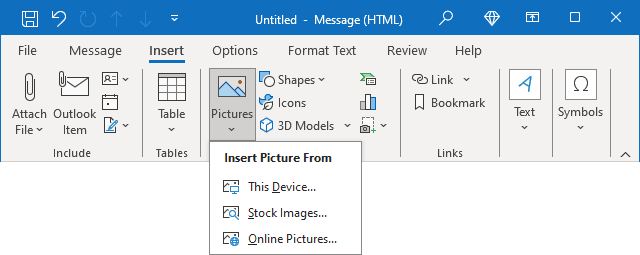
- Select This Device... to choose an image stored on the local computer, laptop, shared locations, or connected network server (see an example above).
- Select Stock Images... to choose Stock Images, Icons, Cutout People, Stickers, Illustrations, and Cartoon People from the stock image library (see an example above).
- Select Online Pictures... to find and insert images from the Internet (see an example above).
Note: Inserted (embedded) images don't need to be downloaded to be seen by the recipient.
Outlook inserts the selected file into the message body:

Resize and scale a picture manually
You can change the visible size of an image without changing its size or resolution by doing the following:
1. Select the picture you want to resize.
2. Click and hold one of the corners resize handles, then drag the handle toward the center to make the image smaller or away from the center to make the image larger:

Note: Click and drag the sides sizing handles to stretch an image horizontally or vertically:

Resize and scale a picture to the exact dimensions
To resize or scale an image to exact dimensions, select it, then do one of the following:
- Use the ribbon commands to type or change the image sizes:
- If you use the Simplified ribbon (see more about customizing ribbons), on the Picture Format tab, select the appropriate values in the Height and Width fields:

Note: If you don't see these fields on the ribbon, click the More commands button - three points to the very right of the ribbon buttons:
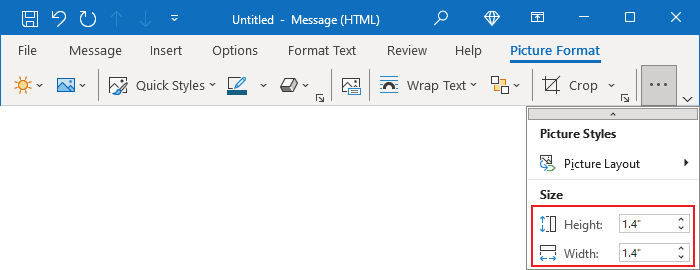
- If you use the Classic ribbon, on the Picture Format tab, in the Size group, select the preferred values in the Height and Width fields:

- If you use the Simplified ribbon (see more about customizing ribbons), on the Picture Format tab, select the appropriate values in the Height and Width fields:
- Open the Layout dialog box by one of the methods:
- On the Picture Format tab, in the Size group, click the dialog box launcher:
 or
or

- Right-click the selected picture and choose Size and Position... in the popup menu:

- On the Picture Format tab, in the Size group, click the dialog box launcher:
In the Layout dialog box, on the Size tab:
- In the Height or Width sections, type or choose the appropriate image sizes,
- In the Scale section:

- Rescale the picture by changing the Height and Width percentages.
- Select the Lock aspect ratio checkbox (selected by default) to scale the picture by height and width using the same percentage.
Clear the Lock aspect ratio checkbox to scale height and width separately.
- Select the Relative to original picture size check box (selected by default) to scale the picture height and width as percentages of the original size.
Note: See the picture's original size in the Original size section.
Compress pictures
Image compression preserves the height and width of the visible part of the image (relevant for images that have been cropped) but reduces the resolution. Images with lower resolution have smaller file sizes.
To compress an image or several images, select them, then do the following:
- If you use the Simplified ribbon (see more about customizing ribbons), on the Picture Format tab, click the More commands button - three points to the very right of the ribbon buttons, then click the Compress Pictures... button:

- If you use the Classic ribbon, on the Picture Format tab, in the Adjust group, click the Compress Pictures button:
 or
or

In the Compress Pictures dialog box:
- In the Compression options group:
- If you want to compress only the selected picture, select the Apply only to this picture checkbox (selected by default).
To compress all the pictures in the email message, clear this checkbox.
- Select the Delete cropped areas of pictures checkbox (selected by default) if you want Outlook to get rid of any cropped parts of the image.
When you clear this checkbox, Outlook only hides the "cropped" parts. This hiding is good if you want to be able to restore the cropped parts, but it's bad for file size, and it can also have security implications. For example, a client may be able to recover a portion of a graphic that you intended to crop out of a document.
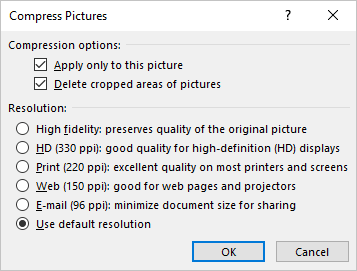
- If you want to compress only the selected picture, select the Apply only to this picture checkbox (selected by default).
- In the Resolution group, select the preferred resolution:
- High fidelity: preserves quality of the original picture,
- HD (330 ppi): good quality for high-definition (HD) displays,
- Print (220 ppi): excellent quality on most printers and screens,
- Web (150 ppi): good for web pages and projectors,
- E-mail (96 ppi): minimize document size for sharing,
- Use default resolution (default).
PPI is pixels per inch, and a higher number indicates higher quality. If you're not sure, use the Use default resolution option - you can always reduce it later, but you can't restore information if you choose a lower setting.
Note: When you compress an image to reduce size, the displayed details change. This means that the image may look different after compression than before.
