Insert and resize pictures in Outlook for Web
In Outlook for the Web, you can reduce the size of the inserted image, and therefore the size of the message, by compressing the image by reducing the number of dots per inch (DPI):

Note: Since each message you send is stored in your Sent Items folder, reducing the size of attachments can also help keep your mailbox size small.
Add or insert pictures
To insert a picture that displays in the body of an email message in Outlook for Web, in the Message window (in a new message, a reply, or a forwarded message), position the cursor where you want an image to be placed in the message body, then:
- If you use the Simplified ribbon (see more about customizing ribbons), on the Insert tab, click the Pictures button:

- If you use the Classic ribbon:
- On the Insert tab, in the Include group, click the Pictures button:

- On the Message tab, in the Include group, click the Pictures button:

- On the Insert tab, in the Include group, click the Pictures button:
In the Open dialog box (the File Explorer window), select a file on your computer by highlighting it and clicking the Open button (or double-clicking the file name):

Note: To insert more than one file, press and hold the Ctrl key while selecting multiple files, then click the Open button.
Outlook inserts the selected file as an embedded picture:

Resize or scale a picture manually
If the image looks too big or too small, change its apparent size without changing its size or resolution by doing the following:
1. Select the picture you want to resize.
2. Click and hold one of the corners resize handles, then drag the handle toward the center to make the image smaller or away from the center to make the image larger:

Note: Click and drag the sides sizing handles to stretch it horizontally or vertically:

Resize and scale a picture
Outlook for Web proposes an interesting way to resize an image to the percentage of its size. To resize an image, select it, then do one of the following:
- Use the ribbon commands:
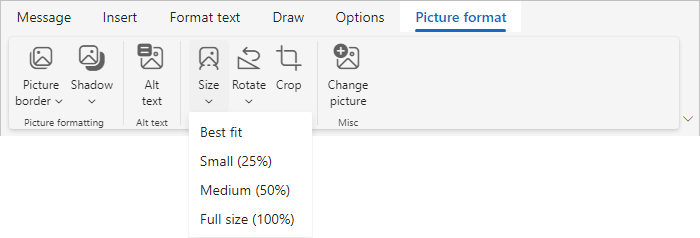
- If you use the Simplified ribbon (see more about customizing ribbons), on the Picture Format tab, click the Size button, then choose one of the proposed options:
- Best fit,
- Small (25%),
- Medium (50%),
- Full size (100%):

- If you use the Classic ribbon, on the Picture Format tab, in the Size group, click the Size button, then choose the option you prefer:

- If you use the Simplified ribbon (see more about customizing ribbons), on the Picture Format tab, click the Size button, then choose one of the proposed options:
- Right-click the picture to select the Size list from the popup menu:

Note: Outlook for Web automatically resizes images to your chosen dimensions and removes any cropped portions.


