Work with Send/Receive groups in Outlook
Also, you can create a Send/Receive group based on an existing group, edit, rename, and remove any of them.
Create a new Send/Receive group
To create a new group of accounts, do the following:
1. Open the Send/Receive Groups dialog box by doing one of the following:
- On the File tab, click Options:

In the Outlook Options dialog box, select the Advanced tab.
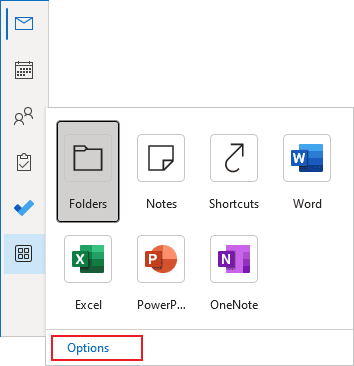
Note: You can easily open the Advanced tab in the Outlook Options dialog box by right-clicking the More Apps icon in the Navigation bar and choosing Options in the popup menu (see more about customizing the Navigation bar in Outlook):
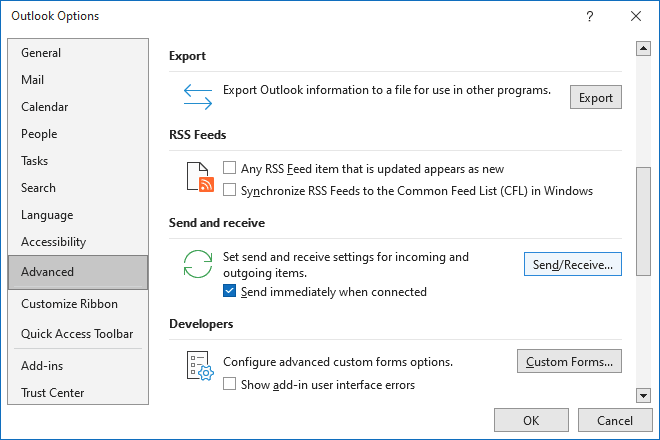
In the Outlook Options dialog box, on the Advanced tab, under Send and receive, click the Send/Receive... button:
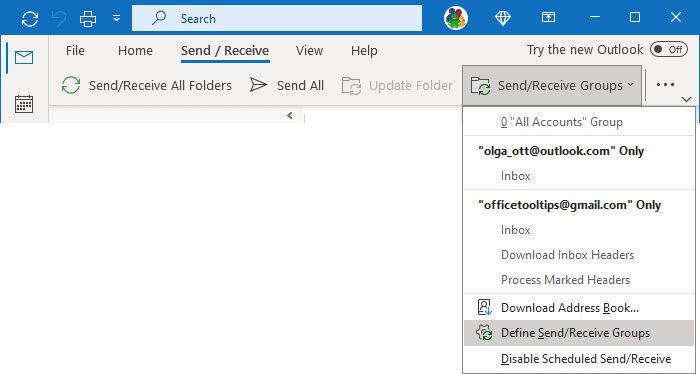
- If you use the Simplified ribbon (see more about customizing ribbons), on the Send / Receive tab, click the Send/Receive Groups dropdown list (if you don't see it on the ribbon, click the More commands button - three points to the very right of the ribbon buttons), then choose Define Send/Receive Groups:
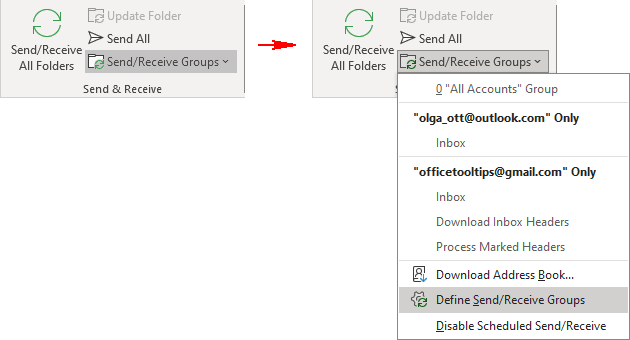
- If you use the Classic ribbon, on the Send / Receive tab, in the Send & Receive group, click the Send/Receive Groups button, then choose Define Send/Receive Groups:
- Press Ctrl+Alt+S.
2. In the Send/Receive Groups dialog box, click the New... button:

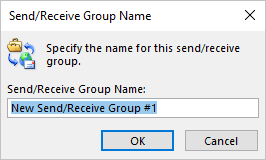
3. In the Send/Receive Group Name dialog box, type a name for the new Send/Receive group, then click OK:
All available accounts are listed in the Send/Receive Groups dialog box (see below).
Include and exclude accounts to a Send/Receive account group
To include into or exclude an account from the Send/Receive group, open the Send/Receive Groups dialog box (see above), then do the following:
1. Select the group account to which you need to include or exclude accounts, then click the Edit... button:

2. In the Send/Receive Settings dialog box:
- Select the Include the selected account in this group checkbox to include the account in the account group,
- Clear the Include the selected account in this group checkbox to exclude the account from the account group:

Create a Send/Receive group based on an existing group
Instead of creating a new group of accounts and reviewing each account to include or exclude it, you can copy an existing group and make only the necessary changes. To create a new Send/Receive group based on an existing one, do the following:
1. In the Send/Receive Groups dialog box (see above how to open this dialog box), select the group that you want to copy, and then click the Copy... button:

2. In the Send/Receive Group Name dialog box, type a name for the new Send/Receive group, and then click OK:

Select the new copied Send/Receive group, then make changes in the Send/Receive Settings dialog box by clicking the Edit... button.
Edit the accounts group
For each account group, you can configure various actions, such as:
- Is the account included when sending or receiving mail - see how to include and exclude an account from a group,
- Whether mail should be sent or received or both from the account - see how to set up an account as Send-Only or Receive-Only,
- How often send/receive actions can be performed - see how to change the intervals between sending and receiving mail sessions,
- Restrictions on the size of downloaded messages - see how to change the size of downloaded messages (only works for some accounts),
- Download only the headers of new messages - see how to configure the download of only message headers (works only for some accounts),
- Settings for Outlook offline mode (see below).
To make changes in the Send/Received group, in the Send/Receive Groups dialog box (see above how to open this dialog box), select the group that you want to modify:

- Under Setting for group {group name}:
- Customize whether an account is included when you send or receive mail by selecting or deselecting the Include this group in send/receive (F9) checkbox (selected by default),
- Modify the scheduled send/receive interval in the Schedule an automatic send/receive every {X} minutes field (selected and set to 30 minutes by default),
- Configure the need to start a sending/receiving session when closing Outlook by selecting or deselecting the Preform an automatic send/receive when exiting checkbox (deselected by default).
- Under When Outlook is Offline, customize settings for offline work.
To edit the account settings in the Send/Receive group, such as size limits, in the Send/Receive Groups dialog box, click the Edit... button:

Make the necessary changes in the Send/Receive Settings dialog box, then click OK.
Rename a Send/Receive group
To rename a group of accounts, do the following:
1. In the Send/Receive Groups dialog box (see above how to open this dialog box), select the group that you want to rename, and then click the Rename button:

2. In the Send/Receive Group Name dialog box, type a new name for the selected group, then click OK:

Remove the group of accounts
To remove the group of accounts, in the Send/Receive Groups dialog box (see above how to open this dialog box), select the group that you want to delete, and then click the Remove button:

Notes:
- The account information is not deleted when you remove a send/receive group.
- You cannot delete the All Accounts send/receive group.
- When you delete an account in Outlook, they are automatically removed from the sending and receiving groups.
