How to customize Navigation bar in Outlook
- In the lower-left corner of the window, above the status bar (the old view of the Navigation bar):

- On the left of the Navigation Pane (the new view of the Navigation bar, available from the version 2207):

Customize the Navigation bar at the bottom (old version)
By default, Microsoft Outlook displays Mail, Calendar, People, and Tasks buttons on the Navigation bar and the ellipsis button (or three-point button) for other options. Moreover, you can switch from icons to texts and remove and reorder buttons on the Navigation bar.
To configure the Navigation bar buttons at the bottom, do the following:
1. On the Navigation bar, click the ellipsis or three points (···) button and then click Navigation Options...:

2. In the Navigation Options dialog box:

- Change the number for the Maximum number of visible items to change how many switching buttons appear in your Navigation bar.
- Check or clear the Compact Navigation checkbox to switch between icons and texts for the Navigation bar buttons.
If the Compact Navigation checkbox is selected, the Navigation bar will display icons (see above) - the compact view of the Navigation bar:

If the Compact Navigation checkbox is unselected, the Navigation bar displays the texts instead of icons:

- Under Display in this order, move the buttons by clicking Move Up or Move Down to change the view order:

For example, you can move the Calendar view before the People view button.
Switch between new and old Navigation bar layout
The new version of Outlook displays a navigation bar on the left side of the Navigation Pane:

Outlook allows you to temporarily move the Navigation bar back to the bottom of the Navigation Pane, but eventually, the Navigation bar will be permanently located on the left side.
To hide the new Navigation bar on the left side and display instead the Navigation bar at the bottom, do the following:
1. On the File tab, click the Options button:

2. In the Outlook Options dialog box, open the Advanced tab.
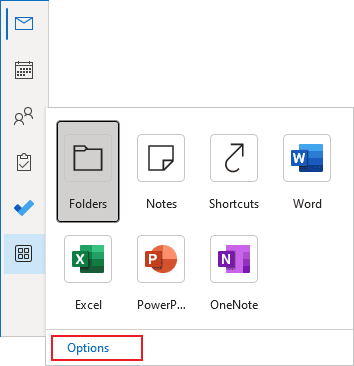
Note: You can easily open the Advanced tab in the Outlook Options dialog box by right-clicking the More Apps icon in the Navigation bar and choosing Options in the popup menu:

See more about customizing the Navigation bar in Outlook.
3. In the Outlook Options dialog box, on the Advanced tab, under Outlook panes:

- Clear the Show Apps in Outlook checkbox to display the Navigation bar at the bottom.
- Select the Show Apps in Outlook checkbox to display the Navigation bar on the left.
4. Click the OK button to close the Outlook Options dialog box.
Outlook displays a message asking you to restart the application to apply changes:

After restarting Outlook, the Navigation bar will be positioned according to the settings.
Customize the Navigation bar on the left side (new version)
By default, Microsoft Outlook displays Mail, Calendar, People, Tasks, To Do, and More Apps buttons on the Navigation bar.
- To pin or unpin an icon, right-click on it and choose Pin or Unpin:
 or
or

- To move icons up or down (except the Mail and Calendar icons - at the moment, they can't be moved from the first and second placements, respectively), right-click and hold some of them to organize the order you prefer:

See also this tip in French: Comment personnaliser votre barre de navigation.

