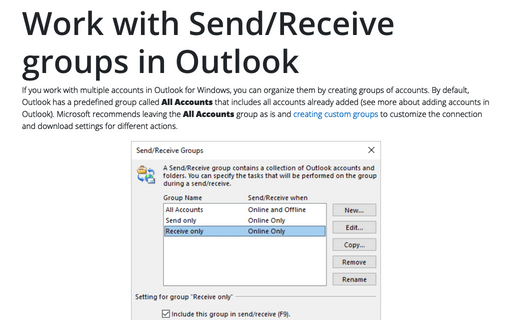
How to set Outlook to download only E-mail headers

This enables you to browse through your emails without actually having to download all the emails and their attachments, which can often be a lengthy task.
To work with email headers, you need:
- Configure the account to download only message headers (see how to configure an Outlook account, an account connected via the POP3 protocol to download headers).
- Start download sessions for message headers only. Of course, such processes will only work if you have turned off periodic automatic sessions for message sending and receiving.
- Mark message headers for downloading, deleting, etc.
- Start processing of marked headers.
Note: This works only for Outlook accounts and accounts connected via POP3, but not IMAP protocol...
Customize an account to download email headers
Outlook accounts
To customize an Outlook account to download only email headers, select any folder of the account for which you need to download only headers. Then do one of the following:
- If you use the Simplified ribbon (see more about customizing ribbons), on the Send / Receive tab, click the Download Preferences dropdown list (if you don't see it on the ribbon, click the More commands button - three points to the very right of the ribbon buttons), then select Download Headers:

- If you use the Classic ribbon, on the Send / Receive tab, in the Preferences group, click the Download Preferences button, then select Download Headers:

Once the Download Headers option is selected, the status bar displays the appropriate status:
Connected to: Microsoft Exchange (Headers):
This customization change will not affect emails already downloaded in full. In the future, all new emails will be downloaded with header information only (the special icon ![]() indicates such messages):
indicates such messages):

Accounts connected via the POP3 protocol
To configure Outlook to download only the e-mail headers, do the following:
1. Do one of the following:
- On the File tab, click Options:

In the Outlook Options dialog box, select the Advanced tab.
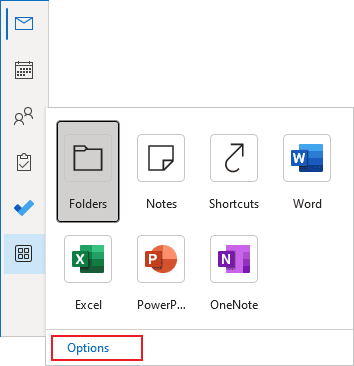
Note: You can easily open the Advanced tab in the Outlook Options dialog box by right-clicking the More Apps icon in the Navigation bar and choosing Options in the popup menu (see more about customizing the Navigation bar in Outlook):
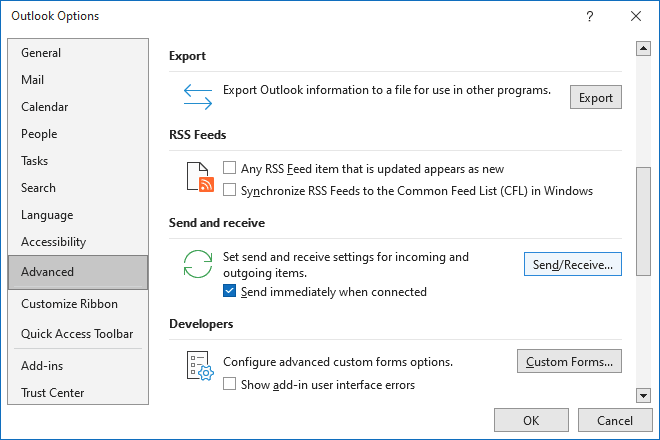
In the Outlook Options dialog box, on the Advanced tab, under Send and receive, click the Send/Receive... button:
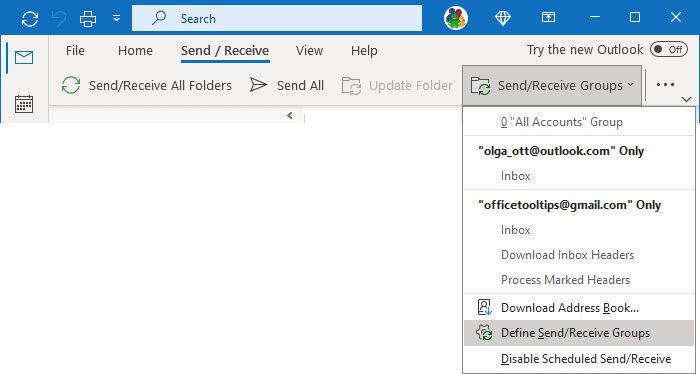
- If you use the Simplified ribbon (see more about customizing ribbons), on the Send / Receive tab, click the Send/Receive Groups dropdown list (if you don't see it on the ribbon, click the More commands button - three points to the very right of the ribbon buttons), then choose Define Send/Receive Groups:
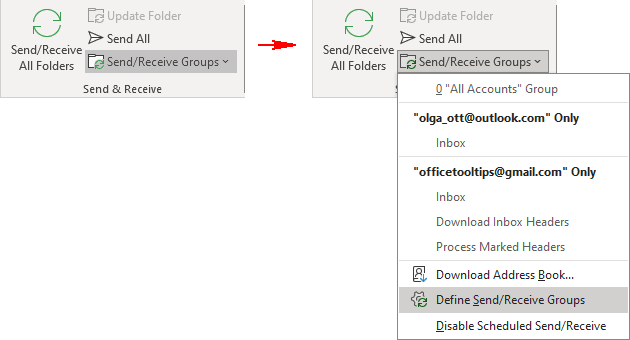
- If you use the Classic ribbon, on the Send / Receive tab, in the Send & Receive group, click the Send/Receive Groups button, then choose Define Send/Receive Groups:
- Press Ctrl+Alt+S.
2. On the Send/Receive Groups dialog box, select a group to modify and click the Edit... button (see more about working with Send/Receive Groups in Outlook):

3. In the Send/Receive Settings dialog box:
- From the Accounts list on the left side of the dialog box, select the mail account for which you want to modify the settings.
Note: This option works only for accounts connected via POP3, not IMAP protocol... See more about downloading message headers for Outlook accounts.
- Make sure that the Include the selected account in this group checkbox is selected to see all the options:

- Select a folder from the list of folders if applicable in the Folder Options section and then choose the Download headers only option.
After receiving messages, you will see only headers in the POP3 account:

Start download message headers for Outlook and POP3 accounts
To download the message headers, do the following:
- If you use the Simplified ribbon (see more about customizing ribbons), on the Send / Receive tab:
- Select the Download Headers command (if you don't see it on the ribbon, click the More commands button - three points to the very right of the ribbon buttons):

- Click the Send/Receive Groups dropdown list, then under an account you use, click the Download Indox Headers command:

- Select the Download Headers command (if you don't see it on the ribbon, click the More commands button - three points to the very right of the ribbon buttons):
- If you use the Classic ribbon, on the Send / Receive tab:
- In the Server group, click the Download Headers button:

- In the Send & Receive group, click the Send/Receive Groups dropdown list, then under an account you use, click the Download Indox Headers command:

- In the Server group, click the Download Headers button:
Mark email headers for downloading, removing, etc.
You can mark the email header to do some action that will take effect:
- The next time Outlook checks for new messages - see more about sending and receiving messages in Outlook.
- After starting the process marked headers (see below).
Mark to download the message
- If you use the Simplified ribbon (see more about customizing ribbons), on the Send / Receive tab, click the Mark to Download command (if you don't see it on the ribbon, click the More commands button - three points to the very right of the ribbon buttons):

- If you use the Classic ribbon, on the Send / Receive tab, in the Server group, click the Mark to Download button:

- Right-click the header and choose Mark to Download from the popup menu:

Outlook changes the Header icon (![]() ) to the Download icon (
) to the Download icon (![]() ):
):

Mark to download this message and leave a copy on the server
- If you use the Simplified ribbon (see more about customizing ribbons), on the Send / Receive tab, from the Mark to Download list, select Mark to Download Message Copy (if you don't see it on the ribbon, click the More commands button - three points to the very right of the ribbon buttons):

- If you use the Classic ribbon, on the Send / Receive tab, in the Server group, from the Mark to Download list, select Mark to Download Message Copy:

Outlook changes the Header icon (![]() ) to the Download Copy icon (
) to the Download Copy icon (![]() ):
):

Unmark to download this message
- If you use the Simplified ribbon (see more about customizing ribbons), on the Send / Receive tab, click the Unmark to Download command (if you don't see it on the ribbon, click the More commands button - three points to the very right of the ribbon buttons):

- If you use the Classic ribbon, on the Send / Receive tab, in the Server group, click the Unmark to Download button:

- Right-click the header and choose Unmark to Download from the popup menu:

Outlook changes any icon to the Header icon (![]() ):
):

Mark to delete the message from the server
Right-click the email header and select Delete from the popup menu:

Outlook changes the Header icon (![]() ) to the Remove icon (
) to the Remove icon (![]() ):
):

Notes:
- To highlight multiple messages, press and hold Ctrl while selecting them.
- For an Outlook account, you also can:
- Click the Download the rest of this message now button in the Reading pane:

- Double-click the message, then click Yes in the Outlook warning message to mark to download the message:

- Click the Download the rest of this message now button in the Reading pane:
- For non-Outlook accounts, you can also open the message - for example, by double-clicking. Outlook displays the warning message where you can choose one of the following actions:

- Unmark this header item,
- Mark to download this message - Outlook changes the Header icon (
 ) to the Download icon (
 ).
). - Mark to download this message and leave a copy on the server - Outlook changes the Header icon (
 ) to the Download Copy icon (
 ).
). - Mark to delete this message from the server - Outlook changes the Header icon (
 ) to the Remove icon (
 ).
).
Select the action you prefer, then click OK.
Start processing marked headers
To start the process for marked headers, run the following command:
- If you use the Simplified ribbon (see more about customizing ribbons), on the Send / Receive tab:
- Click the Process Marked Headers command (if you don't see it on the ribbon, click the More commands button - three points to the very right of the ribbon buttons):

- Click the Send/Receive Groups button, then under an account you use, click the Process Marked Headers command:

- Click the Process Marked Headers command (if you don't see it on the ribbon, click the More commands button - three points to the very right of the ribbon buttons):
- If you use the Classic ribbon, on the Send / Receive tab:
- In the Server group, click the Process Marked Headers button:

- In the Send & Receive button, click the Send/Receive Groups button, then under an account you use, click the Process Marked Headers command:

- In the Server group, click the Process Marked Headers button:
Note: There are no appropriate options for accounts connected via IMAP protocol:

So, if you need to work with IMAP account message headers, you need to switch to a POP3 account. Maybe the best solution will be to create a new profile with the same account connected via POP3 instead of IMAP protocol.
See also this tip in French: Comment configurer Outlook pour télécharger uniquement les en-têtes de messagerie.


