Use Profiles in Outlook
It is recommended to create separate profiles to organize your Outlook data and, in particular, limit access to some data. For example, you can have one profile for work and another for home or use different profiles for different projects. Email profiles allow Outlook to remember which email accounts you use and where each account's information is stored.
Creating profiles is very useful and even necessary, for example, when more than one person works on the same computer:
- When using a computer or laptop at home,
- If, for some reason, you need to provide access to some Outlook data on your work computer while you are on vacation or a business trip, it is recommended that you set up a separate profile for each user.
Note: Outlook e-mail profiles are stored in the Windows registry. When Outlook starts, it retrieves the profile information from the registry.
You can:
- Create a new Outlook profile
- Create a new Outlook profile from the Outlook application
- Create a new Outlook profile in Windows
- Add an email account with automatic connections
- Manually add an email account
- Configure Outlook to always use the same profile
- Edit or modify the profile
- Configure Outlook to prompt to select a profile at startup
- Switch between profiles
- Delete Outlook profile
- To remove an Outlook profile from the Outlook application
- To remove an email profile in Windows
Use a single profile
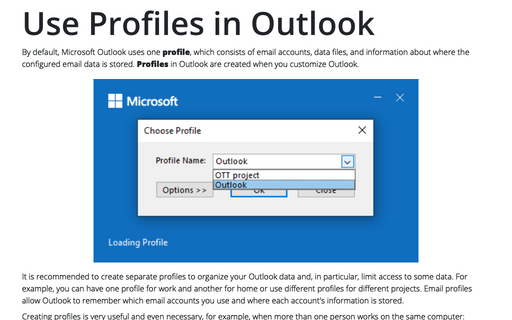
Most Microsoft Outlook users have only one profile created at the first-time start of Outlook. When you run Outlook for the first time, the Startup Wizard automatically guides you through the process of creating a new profile named Outlook:

Any time you add or change e-mail accounts or data files for use, you are modifying your profile. You can change your profile at any time. However, you cannot change the name of a profile after it is created.
Create a new Outlook profile
If you need more than one profile, you can create an additional profile at any time and add the accounts and settings you want to use to that profile. When you switch from one profile to another, you change the e-mail accounts and settings available in an Outlook session.
You can create a new email profile from the Outlook application or the Control Panel:
To create a new profile, do the following:
1. Do one of the following:
A. Create a new Outlook profile from the Outlook application
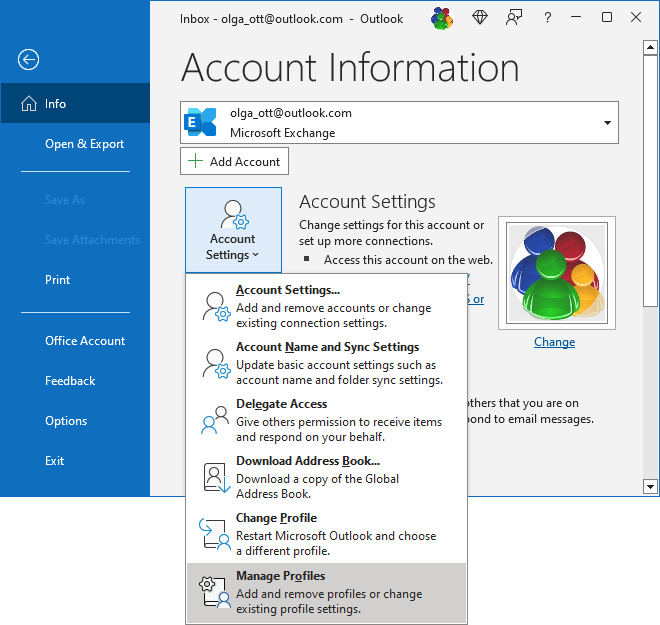
A.1. Click the File tab in the Outlook application to open the Account Information pane.
A.2. In the Account Information pane, click the Account Settings button, then choose Manage Profiles:
B. Create a new Outlook profile in Windows
B.1. Open the Control Panel (see how to open the Control panel in Windows 10).
B.2. In the Control Panel dialog box, in the Search Control Panel textbox, start to type the first symbols of the word Mail to find the Mail (Microsoft Outlook) item:

Note: The Mail (Microsoft Outlook) icon won't appear unless you have installed Microsoft Outlook and have run the program at least once.
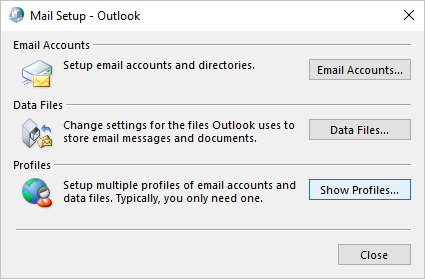
2. In the Mail Setup - Outlook dialog box, click the Show Profiles... button:
3. In the Mail dialog box, click the Add... button:

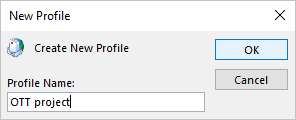
4. In the New Profile dialog box, type a name for the new profile (in this example, OTT project), and then click OK:
Microsoft Outlook proposes to add at least one email account in the Add Account dialog box:

If you want to add the account to the new profile, add any by automatic connection or manually (see below how to add an email account with automatic connections and manually add an email account).
We recommend clicking the Cancel button to create an empty profile:
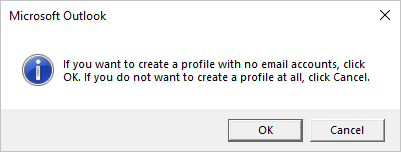
As soon as you start to use the new empty profile, Outlook automatically starts the Connection Wizard that helps you add an e-mail account to this profile.
Note: You cannot use passwords to protect Outlook profiles. To help protect your Outlook data from intrusion by other people, you can:
- Use a password-protected Windows user account.
- Use a password for the Outlook data files.
Add an email account with automatic connections
To add an email account to the new profile, in the Add Account dialog box, fill in the Your Name, Email Address, Password, and Retype Password fields, then click the Next > button. For example:

The Connection Wizard tries to connect to the specified email address using the provided password:
- If the connection fails, Outlook displays a dialog box and asks for your username and password.
- If the connection is successful, a confirmation message and additional account setup options appear:

Note: Even if you entered your username and password correctly the first time, Outlook may prompt you to enter them again.
Manually add an email account
To connect manually to an email account, follow the next steps:
1. In the Add Account - Auto Account Setup dialog box, select the Manual setup or additional server types option, then click the Next > button:

2. In the Add Account - Choose Your Account Type dialog box:

- Select Microsoft 365, enter the Microsoft 365 account email address in the Email Address field, then click the Next > button.
The Connection Wizard tries to connect to the specified email address, then Outlook displays a dialog box and asks for your password.
- If the connection fails, Outlook displays again a dialog box and asks for your username and password.
- If the connection is successful, a confirmation message and additional account setup options appear (the same as for the automatic connection; see an example above).
- Select POP or IMAP or Exchange ActiveSync to add a non-Microsoft email account, then click the Next > button.
In the Add Account - POP and IMAP Account Settings dialog box:
- Fill in the Your Name and Email Address fields,
- Choose the Account Type from POP3 and IMAP:

- Type the Incoming mail server address:
- For POP type: pop.gmail.com
- For IMAP type: imap.gmail.com
- Type the Outgoing mail server (SMTP) address: smtp.gmail.com
Note: If you are configuring a POP or IMAP account, click the More Settings... button to open the Internet Email Settings dialog box, where you can enter additional information, such as:
- E-mail address you want to appear when you reply to a message (see about replying address for more details),
- Outgoing server authentication information,
- Incoming server and Outgoing server port numbers:

Review the settings on each tab and configure them as needed. Then click the OK button to close this dialog box and return to the Account Settings dialog box.
- Click the Next > button to test the connection (you can also click the Test Account Settings... button for the same purpose):

- Close the Test Account Settings dialog box, then click the Finish button to start using the account.
Note: Microsoft, Google, and other e-mail providers constantly update information about the servers and ports they use, how to use or even generate new passwords for third-party applications, and so on. To connect your e-mail account correctly, check the current settings for the appropriate version of Microsoft Outlook and the e-mail provider of the account you are connecting to. We strongly recommend using the automatic account connection (see how to add a new account to Outlook profile).
Configure Outlook to always use the same profile
By default, Outlook uses the profile created by default and named Outlook. You can easily change the profile used by default. To do this, open the Mail dialog box (see above pp.1-2 of how to create a new profile). In the Mail dialog box:
- Under When starting Microsoft Office Outlook, use this profile, make sure that the option Always use this profile is selected.
- From the drop-down list, select the profile that you want to use:

- Click the Apply button.
The next time you open Outlook, it will use the specified profile. See also how to configure Outlook to prompt you to select a profile at startup.
Note: The changes will take effect the next time you start Outlook.
Edit or modify the profile
Each Outlook profile includes the following information:
- Account information includes your username, display name, email server name, and Internet Service Provider (ISP) account password.
- Information about where the e-mail data is stored: In Outlook, data is delivered and stored either on an e-mail server or in data files on your local computer (see more about data files in Outlook). This data includes rules, messages, contacts, calendars, notes, tasks, journals, search folders, and other settings.
To modify the Outlook profile, follow the next steps:
1. Open the Mail dialog box (see above pp.1-2 of creating a new profile).
2. In the Mail dialog box, choose the profile you want to modify, then click the Properties button:

3. In the Mail Setup - *** (profile name, in this example - OTT project) dialog box:

- Click the Email Accounts... button to add, change, or remove any of the email accounts of the profile.
See more about working with email accounts in Outlook.
- Click the Data Files... button to add, modify, or remove data files of the profile.
See more about data files in Outlook.
Configure Outlook to prompt to select a profile at startup
If you use multiple profiles, there is usually one that you use most often. You can easily set up Outlook to always open your most frequently used profile when it starts. Also, you can change the profile you use at any time or set up Outlook to always ask you which profile to open when you start it.
To configure Outlook to prompt you to choose a profile when started, open the Mail dialog box (see above pp.1-2 of how to create a new profile).
In the Mail dialog box, under When starting Microsoft Office Outlook, use this profile, select the Prompt for a profile to be used option, then click the Apply button:

The next time you open Outlook, it displays the Choose Profile dialog box with a list of existing profiles:

- To start using the choosing profile, click the OK button.
- To stop starting Outlook, click the Close button.
- Click the Options > > button to display additional information:

- Select the Set as default profile checkbox to configure Outlook to use the selected profile (the same as the option Always use this profile in the Mail dialog box - see how to configure Outlook to always use the same profile).
- Unselect the Prompt for a profile to be used checkbox to configure Outlook to use the profile by default when it starts.
- Click the New... button to create a new profile (see how to create a new profile for more details).
- Click the Properties... button to modify the selected profile (see how to edit or modify the profile for more details).
- Click the Delete button to remove the selected profile (see how to delete the profile for more details).
Note: The changes will take effect the next time you start Outlook.
Switch between profiles
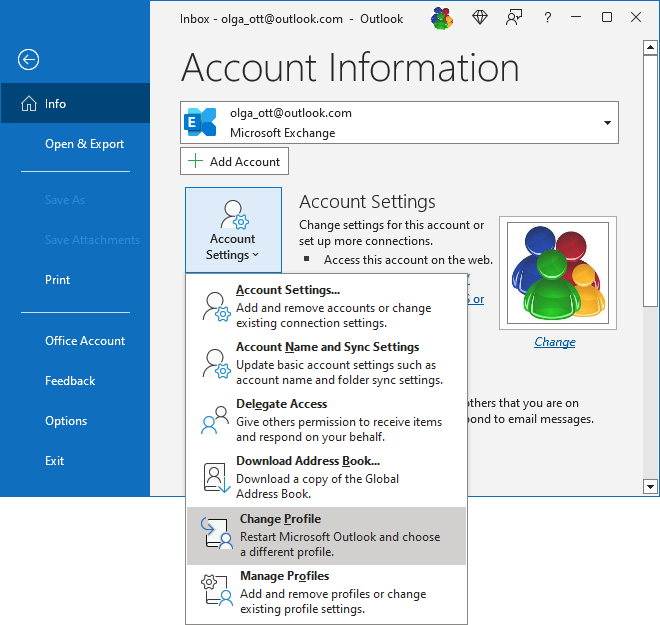
Outlook can open the profile configured as used by default (see how to customize Outlook to always use the same profile), or whenever it starts, Outlook asks which profile to use (see how to configure Outlook to prompt to select a profile at startup). You can't switch between profiles while Outlook is running, but you can change an Outlook profile through its restarting. To change an Outlook profile, do the following:
1. Click the File tab in the Outlook application to open the Account Information pane.
2. In the Account Information pane, click the Account Settings button, then choose Change Profiles:
Outlook displays the message to be closed:

After clicking the OK button, you'll need to start Outlook again manually.
The next time Outlook starts, it will display the Choose Profile dialog box (see more about this dialog box in configuring Outlook to prompt to select a profile at startup):

Delete Outlook profile
To delete an Outlook profile, do the following:
1. Do one of the following:
A. To remove an Outlook profile from the Outlook application
A.1. Click the File tab in the Outlook application to open the Account Information pane.
A.2. In the Account Information pane, click the Account Settings button, then choose Manage Profiles (see above).
B. To remove an email profile in Windows
B.1. Open the Control Panel (see how to open the Control panel in Windows 10).
B.2. In the Control Panel dialog box, in the Search Control Panel textbox, start to type the first symbols of the word Mail to find the Mail (Microsoft Outlook) item (see above).
2. In the Mail Setup - Outlook dialog box, click the Show Profiles... button (see above pp.1-2 of how to create a new profile).
3. In the Mail dialog box, choose the profile you want to delete, then click the Remove button:

Outlook displays a dialog box to confirm that you want to remove the profile. If you are sure, click the Yes button:

Note: Outlook removes profile with all connected accounts. When removing the email account from the Outlook profile, the corresponding data file is removed. See more about data files in Outlook.
