Working with Data files in Outlook
In addition to the automatically created data files, you can add your own Data Files (.pst or PST files) to your profile. For example, you can create a separate data file to store important project documentation and use it as a project archive. For security, you can password-protect the data file, hide it in your profile, and open it as needed. You can also share the data file with others.
You can also use a data file (.pst) to back up and export Outlook items.
Notes:
- In Outlook for Microsoft 365:
- POP accounts use an Outlook Data File (.pst). A PST file is stored on your computer.
- IMAP accounts, Microsoft 365 accounts, Exchange accounts, and Outlook.com accounts use Offline Outlook Data Files (.ost). An OST file is a synchronized copy of the messages saved on a server. It can be accessed from multiple devices and applications, such as Outlook for Windows or Outlook for Mac.
- When messages or other Outlook items are stored in a .pst file, the items are available only on the computer where the file, or folder, is stored.
Create a new personal data file
You can create a new data file from the Outlook application or the Control Panel. To create a new personal data file in Outlook, follow the next steps:
1. Open the Account Settings dialog box by doing one of the following:
A. Create a new data file from the Control Panel
A.1. Open the Control Panel (see how to open the Control panel in Windows 10).
A.2. In the Control Panel dialog box, in the Search Control Panel textbox, start to type the first symbols of the word Mail to find the Mail (Microsoft Outlook) item:

Note: The Mail (Microsoft Outlook) icon won't appear unless you have installed Microsoft Outlook and have run the program at least once.
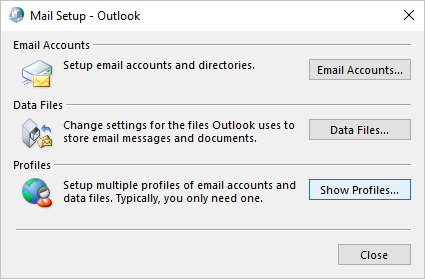
A.3. In the Mail Setup - Outlook dialog box:
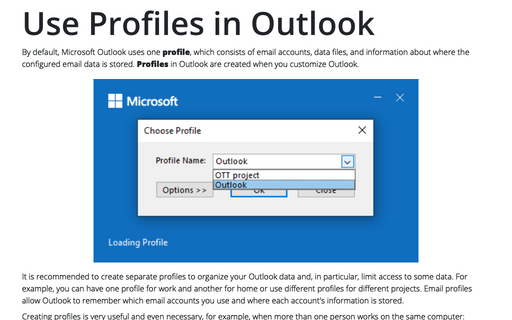
- If you use just one profile, click the Data Files... button:

- If you use several profiles, you need to choose the correct profile:
- Click the Show Profiles... button:
- In the Mail dialog box, choose the profile, then click the Properties button:

- In the Mail Setup - *** (profile name, in this example - OTT project) dialog box, click the Data Files... button:

- Click the Show Profiles... button:
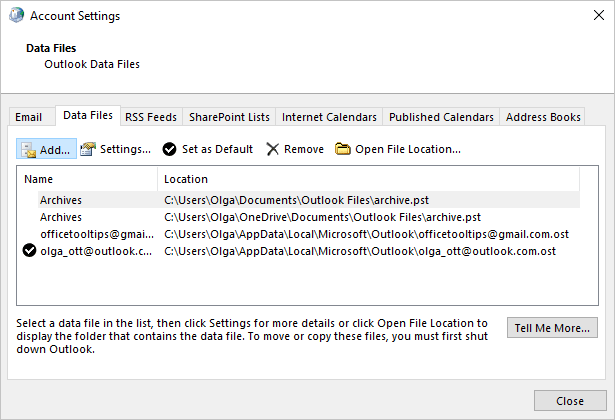
A.4. In the Account Settings dialog box, on the Data Files tab, click the Add... button:
B. Create a new data file from the Outlook application - the common way
A new data file will be created for the current profile. If you use several profiles, see how to switch between them for more details.
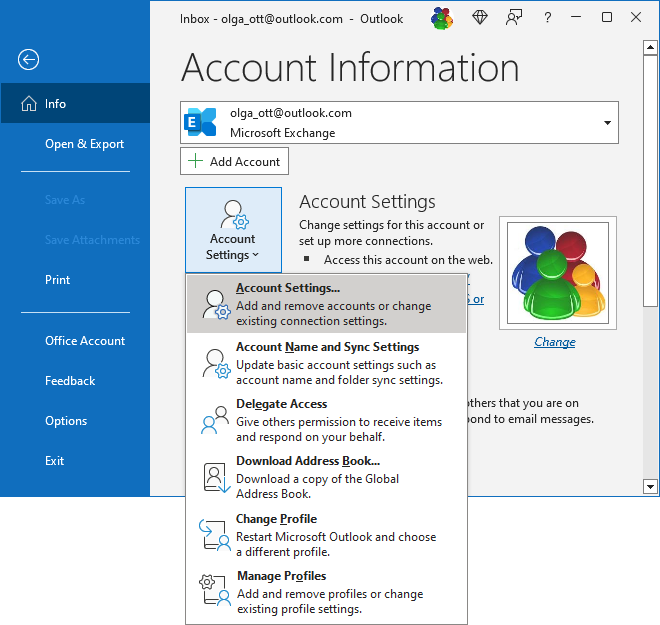
B.1. Click the File tab in the Outlook application to open the Account Information pane.
B.2. In the Account Information pane, click the Account Settings button, then choose Account Settings...:
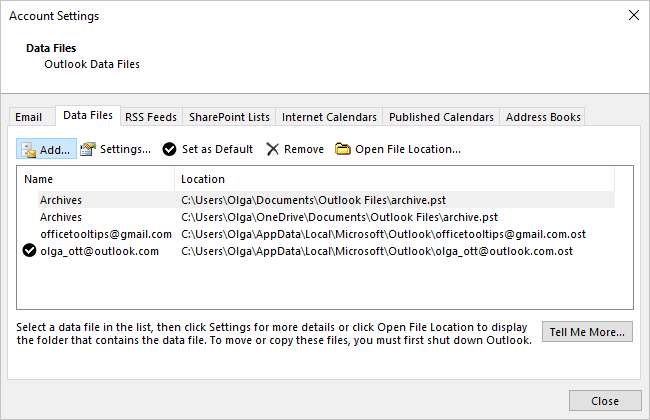
B.3. In the Account Settings dialog box, on the Data Files tab, click the Add... button:
C. Create a new data file from the Outlook application - the simple way
A new data file will be created for the current profile in the Mail view:
- If you use the Simplified ribbon (see more about customizing ribbons), on the Home tab, click the New Email button, then choose Mail Items -> Outlook Data File...:

- If you use the Classic ribbon, on the Home tab, in the New group, click the New Items button, then choose Mail Items -> Outlook Data File...:

2. In the Create or Open Outlook Data File dialog box:
- Choose a location and type the data file name:

- After selecting a location (if needed) and typing a new data file name (in this example, OTT-project), click the OK button:

Outlook automatically adds the newly created data file at the end of the Folders list:

By default, new data files will include a Deleted Items folder and a Search Folders link, but you can add as many personal folders as you like by following the same steps as adding a regular folder to your mailbox. Personal data files behave in the same manner as regular folders. See more about how to work with folders in Outlook.
Modify a data file in Outlook
Outlook offers some modifications you can make for the data file, such as modifying the display name of the data file and changing or applying a password.
To modify a data file, do one of the following:
- On the Account Setting dialog box (see how to open this dialog box), select the new data file from the data files list and click the Settings... button:

Note: If the data file contains password protection, Outlook can ask to enter this password in the Outlook Data File Password dialog box:

- In Outlook:
1. Right-click the data file you want to modify, then select Data File Properties... in the popup menu:

2. In the *** Properties dialog box, click the Advanced... button:

In the Outlook Data File dialog box:

Modify the display name of the Outlook data files
- In the Name field, specify the name for the .pst file as you want it to be displayed in the Outlook folder list
- In the Filename field, you can see the location and the name of the data file. You can't modify this field.
Use a password for the Outlook data files
- Click the Change Password... button to open the Change Password dialog box:

In the Change Password dialog box:
- To apply a new password for the data file, leave the Old password field, then enter and confirm a password in the New password and Verify password fields accordingly.
Select the Save this password in your password list to have Outlook cache the .pst password in your password cache.
- To change an existing password, enter it in the Old password field, then type a new password twice in the New password and Verify password fields.
- To remove the password for this data file, enter the used one in the Old password field, then leave empty the New password and Verify password fields:

- Click the OK button.
- To apply a new password for the data file, leave the Old password field, then enter and confirm a password in the New password and Verify password fields accordingly.
Note: Be careful! Currently, there are a large number of different tools that make passwords easy to crack.
Reduce the size of the Outlook data files
- Click the Compact Now button to start the compact process immediately. This feature is used to compress Outlook data files.
Therefore, it doesn't apply to new .pst files, which need no cleanup. However, you can use this option to compact a large .pst file.
Open the Outlook data file
To open a data file in Outlook for Windows, do one of the following:
- Open the Create or Open Outlook Data File dialog box:
A. Using the Control Panel (see p. A for more details).
B. Using the common way in the Outlook application (see p. B for more details).
C. Using the simple way in the Mail view of Outlook (see p. C for more details).
In the Create or Open Outlook Data File dialog box, choose a location and the data file name, then double-click it, or after selecting (in this example, OTT-project.pst), click the OK button:

- Open the Open Outlook Data File dialog box by clicking the File tab, opening the Open & Export pane, then clicking the Open Outlook Data File option:

In the Open Outlook Data File dialog box, select the data file you want to open, then click OK (or click on the file name twice):

If you set a password for this data file, you need to enter it each time the data file is opened in the Outlook Data File Password dialog box:

Outlook opens the selected data file at the end of the Folders list:

Close the data file
You can keep the file open in the Outlook Folders list as long as you want. For some reason, you may want to close it when you are no longer working with certain data (the project is finished, you no longer need the archived data, etc.). Also, Outlook is a bit faster when you close unnecessary data files.
To close a data file, do one of the following:
- A. In the Folders pane, right-click the name of the data file you want to close, then choose Close *** in the popup menu:

- B. In the Account Settings dialog box (see how to open the Account Settings dialog box from the Outlook application or the Control Panel), on the Data Files tab, select the data file you want to close from the data files list, then click the Remove... button:

Outlook displays the warning message to ensure you want to remove this Outlook Data File:

If you click the OK button, Outlook doesn't actually remove the data file in the file system. It just stops displaying this data file in the Folders pane. You can add it again anytime you will need it.
So, by adding the data files with password protection and closing them in your Outlook, you can hide private or unwanted data from anyone else who has access to your Outlook.
Share the data file with others
You can work with Outlook data files like with regular files. So, to share some Outlook data with others, follow these simple steps:
- create an Outlook data file, password-protected or not,
- move or copy the necessary information into it,
- provide access to this data file in any convenient way, such as uploading it to a shared resource, sending it by email, etc.
The person who gains access to the shared data file must simply open it for one-time or permanent access.
See also this tip in French: Comment ajouter de fichiers de donnée.

