Use AutoCorrect in Outlook
Like other Office applications, Outlook supports AutoCorrect and AutoFormat, which allow Outlook to correct common spelling and typing errors and replace characters with symbols (see AutoCorrect options). AutoCorrect lets you type a short string of characters, such as abbreviations, and replace it with a longer string, such as organization, brand, project, and person names. See also how to use Quick Parts.
For example, if you frequently type the name Jonathan Smith from Bank of America, you might set up AutoCorrect to replace your shorthand typed phrase JSM with Jonathan Smith from Bank of America.
To assign an abbreviation or sequence of characters to the fragment of text, follow these steps:
1. On the File tab, click Options:

2. In the Outlook Options dialog box, open Mail tab.
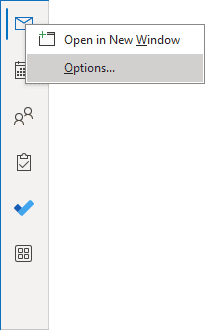
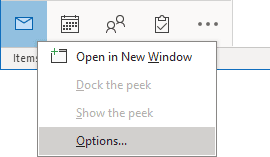
Note: You can easily open the Mail tab in the Outlook Options dialog box by right-clicking the Mail icon in the Navigation bar and choosing Options... in the popup menu:
 or
or

See more about customizing the Navigation bar in Outlook.
3. In the Outlook Options dialog box, on the Mail tab, click the Editor Options... button:

4. In the Editor Options dialog box, on the Proofing tab, click the AutoCorrect Options... button:

5. In the AutoCorrect dialog box, on the AutoCorrect tab:
- Ensure that the Replace text as you type checkbox is selected, and then enter your custom entries:

- In the Replace field, type in the letter or letters you want to use,
- In the With box, type in the text you want to replace.
Note: When you write text in the email message, simply enter the letters you added to the Replace field and press the space bar. Outlook AutoCorrect replaces these letters with the text from the With field.
The length of an AutoCorrect entry is limited only by the available memory. You must give it a unique name after entering or selecting an AutoCorrect entry. Here are some guidelines for naming an AutoCorrect entry:
- Don't use a common word to name an AutoCorrect entry unless you alter that word.
For example, don't name an entry Mr. Instead, precede it with an asterisk or other character to make it unique, such as *Mr. When you don't make the word unique, Outlook inserts the AutoCorrect entry whenever you type that word, whether you want it to or not. It will require too much effort to revert each auto correction if you have chosen a common word.
6. Click the Add button.
Note: Outlook shares your AutoCorrect list with other Office applications. Any AutoCorrect entries you created in Outlook will also work in Excel and in Word.
To rename or delete an AutoCorrect entry, follow these steps:
1. Open the AutoCorrect dialog box.
2. Do one of the following:
- To change the text of an AutoCorrect entry, select the AutoCorrect entry name in the list, change the text, and then click the Replace button:

- To change the name of an AutoCorrect entry, select the AutoCorrect entry name in the list and then click Delete. Type a new name in the Replace box, and click the Add button.
- To delete an AutoCorrect entry, select the entry you want to remove and click Delete.
If you don't need this AutoCorrect to convert the text back to your original typing, just press Ctrl+Z to undo the change.
See also this tip in French: Utilisation de la correction automatique.

