Save your slides as pictures
I. Save slides as pictures – to do so, follow the next steps:
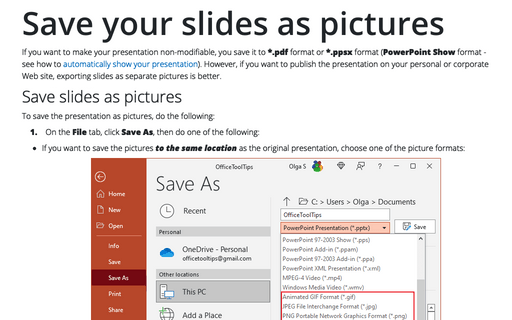
1. On the File tab, click the Save As... and then choose one of the picture formats:

Note: JPEG File Interchange Format (*.jpg) is usually the best option; it is widely supported and uses compression for making files smaller.
2. After choosing the format, click Save.
3. In the Microsoft PowerPoint dialog box, you can:
- Save all slides like different pictures in the folder with the name of your presentation
- Save just this one slide with the name of your presentation

II. In the presentation, you can insert every saved picture – see Fast way to create photo album in PowerPoint:

You can delete the first slide.
Sure, it will work only if you don't use any action in your presentation.
To save animation in the new presentation, you need to save as a picture of all parts of the animation
step-by-step.
In the final presentation, locate all step-by-step pictures in order for the animation to appear. Technically it means to have several new slides in place of one with animation, visually you won't see the difference.
Note: If your PowerPoint presentation includes a lot of pictures, then the file size will be bigger than the original one.
See also this tip in French: Enregistrer vos diapositives sous forme d'images.

