Text effects
Shadow
There are two ways to apply a shadow to the text:
- To apply the default shadow, on the Home tab, in the Font group, click the Shadow button:

This default shadow applies to any text. This shadow appears just below and to the right of the text. The background color automatically determines the color of the shadow:

- To apply the shadow effect to the selected text, do one of the following:
- On the Shape Format tab (or SmartArt Format tab, Table Design tab, Chart Format tab), in the WordArt Styles group, click the Text Effects dropdown list, then select the Shadow list:

From the Shadow list, select the predefined effect from the Outer, Inner, or Perspective shadow groups:

Or click the Shadow Options... to open the Format *** pane to choose more options for the shadow effect.
- On the Format *** (such as Format Shape, Format Chart Area, Format Data Series, etc.) pane, on the Text Options tab, in the Text Effects group, in the Shadow section:

Choose one of the predefined shadow effects from the Presets list. They are the same as the Shadow dropdown list in the ribbon tab: Outer, Inner, or Perspective. To fine-tune the shadow:
- Choose the Color, see how to apply a solid color,
- Move the slider or set a specific value in the appropriate field for each shadow attribute: Transparency, Size, Blur, Angle, and Distance.
For example:

- On the Shape Format tab (or SmartArt Format tab, Table Design tab, Chart Format tab), in the WordArt Styles group, click the Text Effects dropdown list, then select the Shadow list:
Reflection
Reflection creates a partial mirror image of the text beneath the original as if the text were displayed above a body of water or a mirror.
To apply a reflection effect to the selected text, do one of the following:
- On the Shape Format tab (or SmartArt Format tab, Table Design tab, Chart Format tab), in the WordArt Styles group, click the Text Effects dropdown list, then select the Reflection list.
In the Reflection list:

- To remove the reflection effect, choose No Reflection.
- Choose any reflection effect you prefer in the Reflection Variations area.
- Click the Reflection Options... to open the Format *** pane to choose more options for the reflection effect.
- On the Format *** (such as Format Shape, Format Chart Area, Format Data Series, etc.) pane, on the Text Options tab, in the Text Effects group, in the Reflection section:

Choose one of the predefined reflection effects in the Presets list. They are the same as in the Reflection dropdown list on the ribbon tab. To fine-tune the reflection effect, move the slider or set a specific value for:
- Transparency to increase or decrease the degree to which anything behind the text is visible through the reflection
- Reflection Size
- Sharpness or blurriness of the reflection effect in the Blur field
- Distance between text and its reflection.
For example:

Glow
The glow looks like a soft halo effect around the text. You can choose from four levels of glow thickness and any glow color.
To apply a glow effect to the selected text, do one of the following:
- On the Shape Format tab (or SmartArt Format tab, Table Design tab, Chart Format tab), in the WordArt Styles group, click the Text Effects dropdown list, then select the Glow list.
In the Glow list:

- To remove the glow effect, choose No Glow.
- Select a glow preset from the Glow Variations area.
- If the presets don't have the desired color, click the More Glow Colors list to select the color you want from the color picker. See how to apply a solid color for more details.
- Click the Glow Options... to open the Format *** pane to specify more options for the glow effect.
- On the Format *** (such as Format Shape, Format Chart Area, Format Data Series, etc.) pane, on the Text Options tab, in the Text Effects group, in the Glow section:

Choose one of the predefined glow effects in the Presets list. They are the same as in the Glow dropdown list on the ribbon tab. To fine-tune the glow effect:
- Choose the Color, see how to apply a solid color,
- Move the slider or set a specific value for:
- Size of the glow around the text
- Transparency to determine the degree of the translucence of objects located behind the glow.
For example:

Soft Edges
The Soft Edges effect applies only to objects, not to text, so those options:
- Unavailable on the ribbon tabs,
- Are grayed out on the Format *** pane.
Bevel (3-D format)
A bevel is a rarely used text effect, as slanting, bending, curving, or rounding the edges of an object is only visible on large, thick, light- or bright-colored letters.
Note: The Bevel effect is not available for regular text in tables and charts. Thus, the Bevel settings are grayed on the Table Design tab, the Chart Format tab, and the appropriate Format *** pane.
To apply a bevel effect to the selected text, do one of the following:
- On the Shape Format tab (or SmartArt Format tab), in the WordArt Styles group, click the Text Effects dropdown list, then select the Bevel list.
In the Bevel list:

- To remove the bevel effect, choose No Bevel.
- Select a bevel preset from the Bevel area.
- Click the 3-D Options... to open the Format *** pane to specify more options for the 3-D format effect.
- On the Format *** (such as Format Shape, Format Chart Area, Format Data Series, etc.) pane, on the Text Options tab, in the Text Effects group, in the 3-D Format section:

To fine-tune the bevel effect:
- Choose one of the predefined effects from the Top bevel list. They are the same as in the Bevel dropdown list in the ribbon tab. Choose or set the Width and Height of the Top bevel effect (in points).
- The Bottom bevel is rarely used for text. From the Bottom bevel list, choose one of the predefined effects, then choose or set the Width and Height of the Bottom bevel effect (in points).
- The Color and the Size of the Depth option determine the length of the sides of the text when the 3-D effect is applied. It is not visible until 3-D rotations are applied to the text. However, when text is rotated in 3D, it shows "sides" according to the depth setting. See more about how to apply a solid color. By default, the Depth Size is set to 0 points to hide it.
- The Contour settings control the outline Color and Size that appears around the text when the bevel effect is applied. By default, the Contour Size is set to 0 points to hide the outline around the text.
- The Material list offers the predefined Standard, Special Effect, and Translucent surfaces for letters:

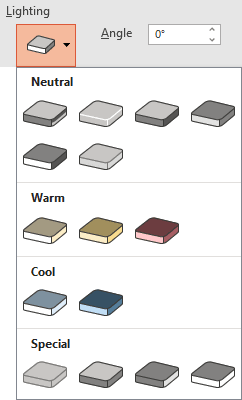
- The Lighting option allows choosing one of the predefined Lighting effects from the Neutral, Warm, Cool, or Special areas and set the light Angle:

For example:

To clear all customization made in the 3-D Format section, click the Reset button.
3-D Rotation
The 3-D Rotation effect slants, tilts, or otherwise manipulates the text to look like it's being viewed at an angle. Four factors make up a 3-D rotation setting:
- X Rotation: Left-to-right rotation
- Y Rotation: Top-to-bottom rotation
- Z Rotation: Rotation around a center point
- Perspective: The height at which you are viewing (above or below)
The 3-D Rotation presets combine these factors to create commonly used effects.
Note: The 3-D Rotation effect is not available for regular text in tables and charts. Thus, the 3-D Rotation settings are grayed on the Table Design tab, the Chart Format tab, and the appropriate Format *** pane.
To apply a 3-D Rotation to the selected text, do one of the following:
- On the Shape Format tab (or SmartArt Format tab), in the WordArt Styles group, click the Text Effects dropdown list, then select the 3-D Rotation list.
In the 3-D Rotation list:

- To remove the rotation effect, choose No Rotation.
- Select a 3-D Rotation preset from the Parallel, Perspective, or Oblique area.
- Click the 3-D Rotation Options... to open the Format *** pane to specify more options for the 3-D Rotation effect.
- On the Format *** (such as Format Shape, Format Chart Area, Format Data Series, etc.) pane, on the Text Options tab, in the Text Effects group, in the 3-D Rotation section:

Choose one of the predefined rotation effects in the Presets list. They are the same as in the 3-D Rotation dropdown list on the ribbon tab.
To adjust each rotation factor separately, choose or type the angle for X Rotation, Y Rotation, Z Rotation, and Perspective.
Notes:
- You can use the appropriate buttons next to the angle field to increase and decrease the angle settings.
- To change the Perspective option, first select any Preset in the Perspective area to display that option.
For example:
- 3-D Rotation:

- Perspective:

To clear all customization made in the 3-D Rotation section, click the Reset button.


