Modify table structure

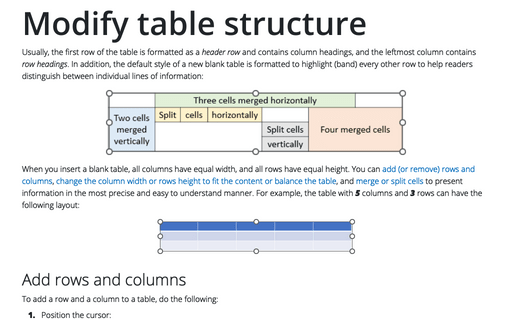
When you insert a blank table, all columns have equal width, and all rows have equal height. You can add (or remove) rows and columns, change the column width or rows height to fit the content or balance the table, and merge or split cells to present information in the most precise and easy to understand manner. For example, the table with 5 columns and 3 rows can have the following layout:

Add rows and columns
To add a row and a column to a table, do the following:
1. Position the cursor:
- to a cell in the row above or below which you need to insert a row,
- to a cell in the column left or right which you need to insert a column.
Note: Select the number of rows or columns you want to insert, starting with the one next to the insertion location.
2. Do one of the following:
- On the Table Layout tab, in the Rows & Columns group:

- Click the Insert Above button to insert a row above the row with the cursor or above the selection,
- Click the Insert Below button to insert a row below the row with the cursor or below the selection,
- Click the Insert Left button to insert a column to the left of the column with the cursor or the selection,
- Click the Insert Right button to insert a column to the right of the column with the cursor or the selection.
- Right-click and select the Insert dropdown list in the Mini toolbar:

To remove one or more rows or columns from a table, do the following:
1. Click anywhere in the row or column you want to remove, select cells in the rows or columns you want to remove, or select the entire rows or columns.
2. Do one of the following:
- On the Table Layout tab, in the Rows & Columns group, click the Delete button, and then click Delete Columns or Delete Rows:
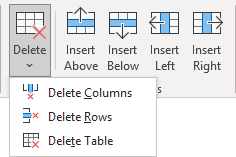
- Right-click and select the Delete dropdown list in the Mini toolbar:

Resize a table and table elements
To change the size of a table, activate the table (click anywhere in the table to see the Table Design and Layout tabs), and then do any of the following:
- Drag the sizing handles to change the height, width, or height and width of the table:

- On the Table Layout tab, in the Table Size group, set the Height and Width to specific dimensions:

Note: On the Table Layout tab, in the Table Size group, select the Lock Aspect Ratio checkbox before changing the table size if you don't want to change the table shape.
To change the width or height of the table elements, do one of the following:
- Select the table element or elements (cell or cells, column or columns, row or rows) you want to change, then do one of the following:
- On the Table Layout tab, in the Cell Size group:

- To change the width of the selection, enter a new number in the Width field, then press Enter,
- To change the height of the selection, enter a new number in the Height field, then press Enter.
Note: You can click the arrows at the right of the appropriate field to increase or decrease the value by one unit at a time.
- Click the Distribute Rows button to make the rows equal width within the selection.
- Click the Distribute Columns button to make the columns equal width within the selection.
- Double-click the right border of a column or the bottom border of a row to size them to fit its widest or longest content.
Notes:
- Setting the width of a column to less than is necessary to display the content of a cell wraps the content within the cell.
- Setting the height of a row to less than is necessary to display its content sets the height to the minimum.
- On the Table Layout tab, in the Cell Size group:
- Point to the inner border of any cell. After the cursor changes to a double-headed arrow, drag the border as you desire:

Merge and split cells
To combine multiple table cells into one cell, do the following:
1. Select the cells that you want to combine.
2. Do one of the following:
- On the Table Layout tab, in the Merge group, click the Merge Cells button:

- Right-click and select Merge Cells in the popup menu:
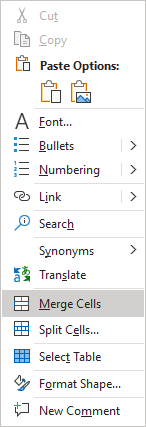
Note: You can also use the drawing tools: activate the table, then on the Table Design tab, in the Draw Borders group, click the Eraser button:

When the cursor changes to an eraser, click the border you no more need to merge cells. After finishing, click the Eraser button again or press the Esc key (see more about drawing a table).
To split the table cell or cells into multiple cells, do the following:
1. Activate or select the cell or cells you want to split.
2. Do one of the following:
- On the Table Layout tab, in the Merge group, click the Split Cells button:

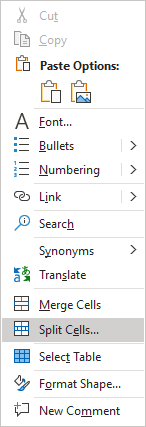
- Right-click and select Split Cells in the popup menu:
3. In the Split Cells dialog box, enter or choose the number of columns and rows to which you need to split the selection:

Every cell in the selection will be split into the specified number of columns and rows.
Note: You can also use the drawing tools: activate the table, then on the Table Design tab, in the Draw Borders group, click the Draw button:

When the cursor changes to a pencil, drag from the point from the cell border at which you want to start the split down to the cell border at which you want to stop it. A dashed line indicates the split location while you're drawing. When you release the cursor, a border of the currently selected line style, width, and color replaces the dashed line:

After finishing, click the Draw button again, click anywhere outside the table, or press the Esc key to stop drawing mode (see more about drawing a table).
