How to use 3D cubes for numbering
See also the numbering list.

To create cubes like the one above, do the following:
1. On the Insert tab, in the Illustrations group, select Shapes:

2. In the Shapes list, in the Basic Shapes group, choose the Cube shape:

3. After pasting this shape into your slide, format it:
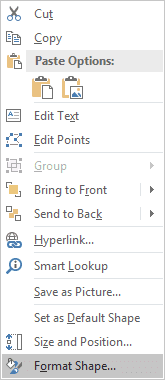
3.1. Right-click on the shape and choose Format Shape... in the popup menu:

3.2. On the Format Shape pane, on the Shape Options tab, in the Fill & Line group:
- In the Fill section, select Gradient fill and then customize colors according to your
preferences:

- In the Line section, select Gradient fill and then customize colors like you want:

After all these changes, the cube will look like:

4. For more interesting result, use the following change - on the Format Shape pane, on the Shape Options tab, in the Effect group, select the Soft Edges section and choose appropriate size:

5. Add text to the shape - just double-click on it and enter text (in this example, 1):

6. The last step for current cube is rotation - in Format Shape pane (to open the Format Shape pane, right-click on the shape and choose Format Shape... in the popup menu), select the Shape Options tab, and then in the Effect group, in the 3-D Rotation section, choose or enter different volumes for X Rotation, Y Rotation, and Z Rotation or click on the appropriate buttons to rotate your cube:

After rotating, the cube should look like:

Now, you can copy a cube and just change colors, text, and rotation.
See also this tip in French: Comment utiliser les cubes 3D pour la numérotation.

