Working with Data files in Outlook
Outlook
2016
Although Outlook automatically creates Data Files as needed when you add accounts, you might want to
add your own Data Files (.pst - files) to a profile. For example, perhaps you use an
Exchange Server account for your primary Outlook store, but want a set of personal folders to serve as an
archive; or perhaps you have an Exchange Server account and are adding a POP3 account.
Follow these steps to add a set of personal folders to your profile:
1. Do one of the following:
- If Outlook is not running, open the Mail applet from the Control Panel:

Click Data Files... to open the Account Settings dialog box.
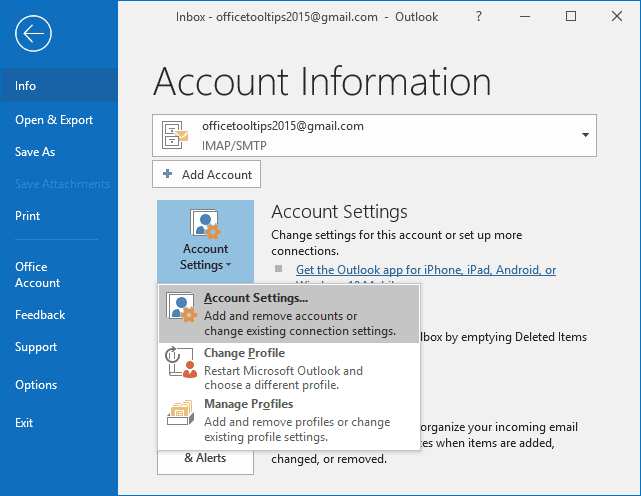
- If Outlook is running, on the File tab, in the Info tab, click the Account
Settings button and then choose Account Settings...:

2. In the Account Settings dialog box, on the Data Files tab, click Add... button:

3. In the Create or Open Outlook Data File dialog box, choose a location and file name for the .pst, and click OK:

4. To change other settings for the .pst file that you just created, do the following:
- Select the new data file from the list and click the Settings... button:

- In the Outlook Data File dialog box, configure settings:

- Name - Specify the name for the .pst as you want it to change in the Outlook folder list
- Password - Enter and confirm an optional password to protect the .pst
and choose the Save this password in your password list to have Outlook cache the
.pst password in your password cache. Use this option if you are concerned
that others might be able to access your computer and view the items in the personal
folders:

- Compact Now - This option doesn't apply to new .pst files, which need no cleanup. However, you can use this option to compact a large .pst file.
See also this tip in French: Comment ajouter de fichiers de donnée.

