Fill and outline options in Microsoft
Moreover, with the help of color palettes, you can apply both borders (outline) and fill colors to various objects, such as shapes, chart elements, or even letters.
This tip describes the customization options common for all Microsoft applications:
- To fill objects and their outlines:
- To fill only objects:
Apply a solid color
In most applications, clicking on the Color button displays the same color palette:

- The Theme Colors palette allows you to select one of the six shades of each of the 10 theme colors. Colors in this palette depend on the current theme.
- The Standard Colors palette allows you to select one of the 10 standard colors available in all Microsoft documents, regardless of the theme. The colors in this palette are the same on all computers.
- The Recent Colors palette allows you to select any of the non-standard colors you have used recently if there are any.
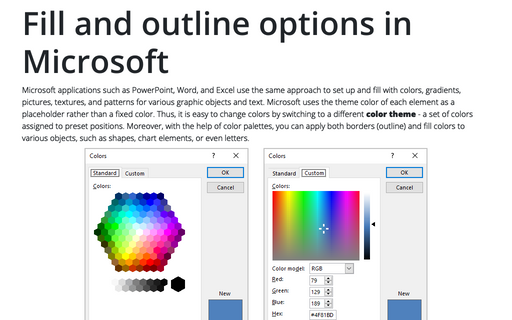
- Click More Colors... to open the Colors dialog and use non-theme colors:
In the Colors dialog box:
- In the Standard tab, choose any color from a color palette that offers permutations of primary, secondary, and tertiary colors in a hexagonal color wheel:

Color from the Standard color wheel remains the same in any Microsoft document regardless of the color theme.
Note: You can create a color transparency effect using the Transparency slider. When this slider is used for color, it creates a watercolor blur effect on the subject so that anything below it can be partially visible through.
- In the Custom tab, select a color by:
- Clicking the rainbow - permutations of primary and secondary colors,
- Choosing one of the sliding the shade scale,
- Entering the appropriate values in the Red, Green, and Blue fields if you are using the RGB (red, green, blue) model selected in the Color model dropdown list:

- Entering the appropriate values in the Hue, Sat, and Lum fields if you are using the HSL (hue, saturation, luminosity) model selected in the Color model dropdown list:

Note: Hue is the tint (green versus blue versus red). A low number corresponds to the red end of the spectrum, and a high number corresponds to the violet end. Saturation refers to the brightness of the color, while Luminosity refers to lightness or darkness. A low saturation value means a shade of gray, and a high value means full color. A high luminosity blends the color with white, while a low luminosity blends the color with black.
- Typing the hexadecimal color values in the HEX field.
A hexadecimal color is specified with: #RRGGBB, where RR (red), GG (green), and BB (blue) are hexadecimal integers - numbers using a radix (base) of 16 - between 00 and FF specifying the intensity of the color.
- In the Standard tab, choose any color from a color palette that offers permutations of primary, secondary, and tertiary colors in a hexagonal color wheel:
Note: PowerPoint additionally offers a very useful feature named Eyedropper. Use the Eyedropper to choose the color from any other object on the slide. To do so, follow the next steps:
1. Click the Eyedropper item. The cursor changes to the shape of an eyedropper.
2. Click any element on the slide to select its color:

Work with gradients
Microsoft applications offer one of the predefined gradients (see the formatting of related objects), but you can always select More Gradients... at the bottom:

Clicking the More Gradients... option opens the Format *** pane, such as the Format Shape pane, Format Picture pane, or Format Data Series pane.
To customize gradient fill, on the Format *** pane, select Gradient fill or Gradient line:

- From the Preset gradients dropdown list, select a gradient option based on the current color palette:

- From the Type list, choose one of the following types:
- Linear changes from one point to another along the straight line. It is possible to move horizontally, vertically, or diagonally, or you can set a specific angle on the Angle field (see below).
- Radial radiates out from the point. It can radiate from the object's corner or any of its corners.
- Rectangular is like Radial, except it radiates as a rectangle rather than a curve.
- Path follows the shape of the object.
- From the Direction dropdown list, select the direction you want the gradient to flow:

- If you chose the Linear type, specify the angle you want the gradient to move along by entering or choosing the appropriate value in the Angle field.
- In the Gradient stops area, change predefined gradient stops:
- To add a new Gradient stop marker:
- Click the Add gradient stop button
 , then reposition the marker that appears on the slider.
 - Click the slider in the approximate location where you want to insert the gradient stop:

Note: A color gradient can have from 2 to 10 gradient stops.
- Click the Add gradient stop button
- To remove a Gradient stop marker:
- Select the marker on the slider and click the Remove gradient stop button
 .
. - Drag the gradient stop marker off from the slider.
- Select the marker on the slider and click the Remove gradient stop button
- Select the color you want for each marker by selecting them one by one and choosing the appropriate color from the Color dropdown list. See how to apply a solid color for more details.
- Set the position, transparency, and brightness for each color for each gradient stop.
Note: You can change values for Transparency and Brightness by moving the markers on the sliders, entering specific percentages, or scrolling the dials.
- To add a new Gradient stop marker:
Insert a picture
One of the commonly used ways to fill in various objects such as shapes, table cells, chart data series, SmartArt, or diagram elements is inserting a background picture. Microsoft applications insert pictures from a file stored on a hard disk, from the contents of the Clipboard, or the online locations.
To use a picture as an object's fill, follow the next steps:
1. Do one of the following:
- On the *** Format tab (such as Shape Format or Chart Format), in the Shape Styles group, click the Shape Fill dropdown list, then select Picture...:

- On the Format *** pane (such as Format Shape or Format Data Series), select the Picture or texture fill option, then click the Insert... button:

2. In the Insert Pictures dialog box, choose the picture location, select the picture file, and then click Open or Insert:

Note: You can fill an object with any graphic object, such as a picture, SmartArt, chart, diagram, etc., from the Clipboard by clicking the Clipboard button.
Use a texture fill
A texture fill is a special picture fill that, when tiled, looks like a surface texture such as wood, marble, or fabric.
You can select one from 24 predefined textures that include fabric, marble, granite, wood grain, and Formica-like textures in various colors, or insert a picture as texture:
- Select a texture you prefer from the Texture dropdown list, or click More Textures... at the bottom of the list:

- Insert a picture you want to use as texture (see how to insert a picture), then:
- Select the Tile picture as texture option to apply the picture at its actual size as a background fill for an object:
- If the picture is smaller than the object it fills, it tiles like a texture (where multiple copies are used).
- A truncated copy appears if the picture is larger than the object it is filling.

- Select the Tile picture as texture option to apply the picture at its actual size as a background fill for an object:
Notes:
- Use other options such as Offset X, Offset Y, Scale X, and Scale Y to control how the picture fill adjust and align within the object (an offset moves it in a specific direction).
- As for colors, you can use the Transparency slider to adjust the texture transparency or set a specific transparency percentage.
Apply a pattern filling
A pattern fill is a special filling type that allows using one of 48 simple patterns with different Background and Foreground colors. To apply a patterned fill, on the Format *** pane (such as Format Shape or Format Data Series), select the Pattern fill option, then click one of the 48 pattern swatches:

- Click the Foreground button to select the primary pattern color.
- Click the Background button to select the secondary pattern color.


