Position pictures, text boxes, shapes on the page
Position images, text boxes, shapes on the page
Word attaches the figure to the paragraph at the current cursor position when you insert a figure. However, you can move the visual object independently of the text and place it anywhere on the page.
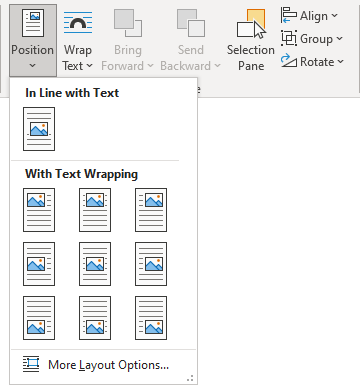
To change the position, on the Picture Format (Graphics Format, Shape Format) tab, in the Arrange group, click the Position button:

- In Line with Text places an object in the paragraph on the same line as the surrounding text
- Position in Top Left with Square Text Wrapping places a figure in the upper left corner of the document page
- Position in Top Center with Square Text Wrapping
- Position in Top Right with Square Text Wrapping
- Position in Middle Left with Square Text Wrapping
- Position in Middle Center with Square Text Wrapping places a picture in the center of the document page
- Position in Middle Right with Square Text Wrapping
- Position in Bottom Left with Square Text Wrapping
- Position in Bottom Center with Square Text Wrapping
- Position in Bottom Right with Square Text Wrapping places a picture in the lower right corner of the document page
Using these options, position the object in a specific location relative to the page margins.
Use the anchor
When changing the text wrapping style from the In Line with Text to another one, Word adds an anchor to the object. In other words, all floating figures are anchored. Select the picture to see its anchor indicated by a small anchor icon ![]() (see how to display non-printing characters in a Word document).
(see how to display non-printing characters in a Word document).
Attention! The anchor and the figure are always on the same page but not in the same place on the page.
By default, the anchor is positioned at the beginning of the nearest paragraph above the upper-left corner of the figure. When you move the object across the page, the anchor moves, using the same logic to place the anchor.
Also, you can select the anchor and drag it to a new location on the page.
Change the layout
To choose additional options for positioning an object, choose More Layout Options... from the dropdown list:
In the Layout dialog box, on the Position tab:

Note: The available positions vary based on the selected text-wrapping option.
- In the Horizontal section, specify that a figure is positioned horizontally:
- Alignment places the object to the Left, Center, or Right relative to:
- Margin
- Page
- Column
- Character
- Left Margin
- Right Margin
- Inside Margin
- Outside Margin
For example:
- Alignment to the Left relative to Margin:

- Alignment to the Left relative to Page:

- Book layout defines where the figure appears on odd (large left margin) or even (large right margin) pages. You can position figures relative to the Inside or Outside of the Margin or Page.
This option is useful if you use the Mirrored margins.
For example, Book layout Inside of Margin:
The odd page The even page 

- Absolute position specifies the exact distance to the right of:
- Margin
- Page
- Column
- Character
- Left Margin
- Right Margin
- Inside Margin
- Outside Margin
Measurements can be positive or negative. The figure will remain in the same position regardless of formatting changes.
For example:
- The Absolute position of -5 inches to the right of Right Margin:

- The Absolute position of 4 inches to the right of Page:

- Relative position specifies a percentage of the distance relative to:
- Margin
- Page
- Left Margin
- Right Margin
- Inside Margin
- Outside Margin
For example, Relative position of 20% relative to Margin:

Note: 8.5 inches page with 1-inch margins in each side = 6.5 inches * 20% = 1.3 inch
- Alignment places the object to the Left, Center, or Right relative to:
- In the Vertical section, specify that an object is positioned vertically:
- Alignment allows to set the object to the Top, Centered, Bottom, Inside, or Outside relative to:
- Margin
- Line
- Top Margin
- Bottom Margin
- Inside Margin
- Outside Margin
For example, Alignment to the Top relative to Margin:

- Absolute position specifies the exact distance to the right of:
- Margin
- Page
- Paragraph
- Line
- Top Margin
- Bottom Margin
- Inside Margin
- Outside Margin
Measurements can be positive or negative. The figure will remain in the same position regardless of formatting changes.
For example:
- The Absolute position of 3 inches to the right of Line:

- The Absolute position of -7 inches to the right of Bottom Margin:

- Relative position specifies a percentage of the distance relative to:
- Margin
- Page
- Top Margin
- Bottom Margin
- Inside Margin
- Outside Margin
For example, Relative position of 25% relative to Page:

Note: 11 inches page * 25% = 2.75 inches
- Alignment allows to set the object to the Top, Centered, Bottom, Inside, or Outside relative to:
Note: It is impossible to fix a figure on the page.
- In the Options section:
- Move object with text moves the figure along with the text in which it is located.
If this option is selected, the picture moves with a paragraph (anchored to a paragraph). When you delete or add any context before that paragraph, the figure will move with it.
If the Move object with text option is deselected, the picture is anchored to the page location. After deleting or adding context before the anchor, except when the paragraph moves to the next page - the figure moves and keeps its position relative to the page.
Note: This option works only for floating figures (see Text Wrapping for more details).
For example:
- Before moving:

- After moving with the selected Move object with text check box:

- After moving with the deselected Move object with text check box:

When you select this option, the horizontal and vertical alignment will change to Absolute positions relative to the margin (horizontal) and paragraph (vertical).
- Before moving:
- Lock anchor keeps the anchor at the same place (at the paragraph) when the figure is removed. Word changes the anchor symbol to the locked anchor
 .
.
The anchor symbol will remain to the left of the start of the anchored paragraph, regardless of the picture position.
For example:
- Before moving:

- After moving with the selected Lock anchor check box:

Note: An example is shown with hidden Headers and Footers.
However, if you select and drag a paragraph to another page, the picture shifts to another page.
- Before moving:
- Allow overlap allows to layer figures on top of each other.
For example:

To easily work with such figures, open the Selection pane. To change which figure in front or behind another one, use the Bring Forward or Send Backward buttons in the Arrange group on the Picture Format (Graphics Format, Shape Format) tab:

- Layout in table cell is the option from the older versions of Word and older file formats.
For example, in a *.doc file, you can't put an image whose text wrapping style is set to Square inside a table cell unless the Layout in table cell option is selected:

- Move object with text moves the figure along with the text in which it is located.
To align a figure on the page simpler, see snap an object to the Grid or a Shape.
Main features of the anchor
- The anchor is related to the paragraph, not words, characters, or other objects.
- When you select the text where the figure is anchored, the figure also is highlighted.
- If you move or delete the text where the figure is anchored, the figure will also be moved or deleted.
- If the paragraph with the anchor is pushed to the next page, the anchored figure also jumps to the next page, even if the figure is located above the anchor.
Delete an anchor
The anchor cannot be deleted. An anchor is a feature of the floating figure.
If the anchor is visible, the figure is selected, and pressing the Delete key will delete the figure and anchor.
Select the figure and change the text wrapping style to the In Line with Text to remove the anchor. The figure will cease floating, and Word will stop showing its anchor when you select this figure.


