Pagination breaks in a Word document
Page Break
A page break is one of the most used breaks.
Word creates a new page if no more content on the document page can fit between the top and bottom margins. In this case, Word automatically inserts a soft page break, a page break that moves when the preceding content changes:
 or
or

You can manually insert a page break if you want to break the page at another location:
 or
or

When you edit document content, Word changes the location of the soft page breaks for automatic page breaks but not for manually inserted page breaks.
You can display page breaks as regular nonprintable symbols. Word displays them as ![]() .
.
To insert a manual page break, position the cursor where you want to insert the page break in the document, and then do any of the following:
- On the Insert tab, in the Pages group, click Page Break:

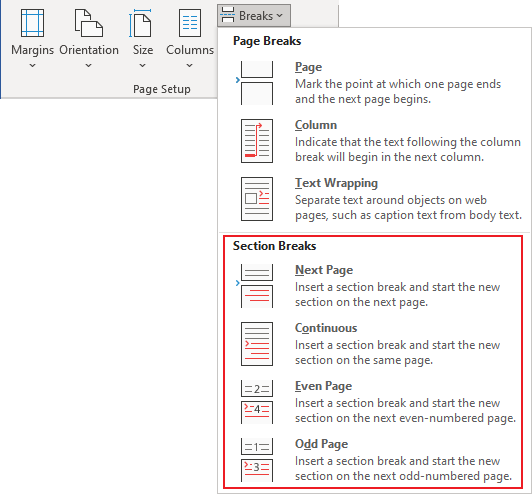
- On the Layout tab, in the Page Setup group, click Breaks, and then click Page:

- Press Ctrl+Enter.
Note: Automatic (soft) and manual page breaks start the new page. All formatting from the original page applies to the new one. Use this type of break to start a new page with the same formatting.
To control page break settings, modify the page setting options such as page margins. To control paragraph page break settings, modify options on the Line and Page Breaks tab of the Paragraph dialog box. See How to keep lines and paragraphs together in a Word document.
See below how to delete a page break.
Column Break
You can format an entire document or a document section in columns. Within the columnar text, you can insert a column break to specify where you want to end one column and start another:

You can display column breaks as regular nonprintable symbols. Word displays them as ![]() .
.
To insert a column break, position the cursor at the beginning of the line you want to start in the new column, and then do any of the following:
- On the Layout tab, in the Page Setup group, click Breaks, and then click Column:

- Press Ctrl+Shift+Enter.
See below how to delete a column break.
Text wrapping break
See how to create and use line or text-wrapping breaks.
Section Break
Suppose you want to format pages of the part of your document differently from the rest of the document. For example, page orientation is different from the surrounding pages. Insert section breaks above and below the pages of the specific part (see how to use different page orientations inside one document):

Suppose you select a section of text and change its page orientation, margins, format it in columns, etc. In that case, Word automatically inserts section breaks at the beginning and end of the selected text to delineate the area with new formatting.
To insert a section break, do the following:
1. Position the cursor where you want to insert the section break in the document.
2. On the Layout tab, in the Page Setup group, click Breaks, then under Section Breaks, select one of the options:

- Next Page break starts a new section on the next page. This option moves the text to the next page and allows you to apply different formatting for the new section. The Next page section break is shown as
 (see how to display section breaks).
 - Continuous break starts a new section without affecting page breaks. Continuous page section break is shown as
 .
. - Even Page break starts the following section on the next even-numbered page. Even page section break is shown as
 .
. - Odd Page break starts the following section on the next odd-numbered page. Odd page section break is shown as
 .
.
You can configure the page layout, page setup, and headers and footers for each section independently.
To remove a page break, column break, or section break, click at the left end of the break or select the break and press the Delete key.


