How to create a flowchart in Word

Managers, system analysts, programmers, and engineers adopted flowcharts as a mean of communication for describing:
- Document workflows
- Data flows
- System operation flows
- Algorithms
No wonder that building blocks and rules of flow charts were standardized by the American National Standards Institute (ANSI) and International Organization for Standards (ISO) more than 50 years ago. The current standard defines the drawing direction from top to bottom and left to right and specific symbols for different types of entities, actions, etc. E.g.:
| Rectangle with round corners marks for starting and terminating states | |
 |
Box with straight corners represents the process stages |
 |
Parallelogram illustrates data input/output |
 |
Diamond marks conditional branching |
| Arrow shows the process flow |
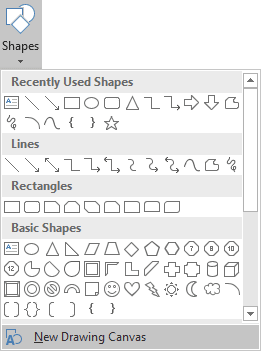
You can find all these shapes and other useful visual elements in the Shapes dropdown list on the Insert tab of Microsoft Word.
The flowchart above is "cross-functional" and defines the responsibility zones of different business units.
To create a diagram like the one above, follow the next steps (we recommend to check the tip how to easily organize shapes in Word, which demonstrates easy tricks to simplify the drawing routine):
Add the drawing canvas
The drawing canvas is an essential element for the flow chart that you need to add before adding the flow shapes because of flowchart connectors. You can add flowcharts connectors only between the shapes within the drawing canvas:
1. On the Insert tab, in the Illustrations group, click Shapes:

2. On the Shapes list, in the bottom, choose New Drawing Canvas:

Word adds the new drawing canvas to your flow chart:

Draw the flowchart blocks
3. On the Shapes list, in the Flowchart group, select the block you want to add:

4. To add text to the selected shape, just double-click in it and enter the text.
Connect the flowchart blocks by connectors
5. To connect shapes, do the following:
- On the Insert tab, in the Illustrations group, click in the Shapes list and
then select one of the connectors in the Lines group:

- Select the beginning point on the border of the first shape (source) and the ending
point on the edge of the second shape (target):

For more customizations of shapes and connectors, see how to change format of diagram shapes in Word and how to change flowchart shapes or how to change connector type for flowchart.
Top-to-down flowcharts are perfect for the Portrait page orientation in Microsoft word. For the Landscape page orientation or the PowerPoint presentation, the preferred layout is left-to-right. Sometimes left-to-right flow diagrams with delimited borders of organization unit activities are called Swimlane diagrams or Swimlane flowcharts.
See also this tip in French: Comment créer un organigramme des opérations dans Word.

