Add and remove columns in Outlook
To add and remove columns, follow these steps:
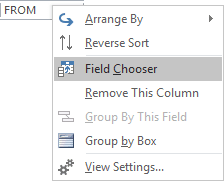
1. Open the folder that you want to modify in either Single or Preview view, right-click the column header bar, and choose Field Chooser in the popup menu:

2. In the Field Chooser dialog box, find the name of the field you want to add, and then drag the field from the Field Chooser dialog box to the desired location on the column header bar. Outlook 2016 displays a red arrow at the top of the column header bar to indicate where it inserts the column:

3. Add other colimns if necessary:
- Account
- Attachments
- Categories
- Conversations
- Date Received
- Date Sent
- Flag Status
- Folder
- From
- Mentions@
- Priority
- Size
- Status
- Subject
- To
4. To remove a field, drag the field from the column header bar:

5. Close the Field Chooser dialog box.
Notes:
- If you do not find the column you need in the Available columns list, you can choose other
sets of fields by selecting another list from the drop-down at the top of the Field Chooser
dialog box:

- You can also use this dialog box to create custom fields. To do this, click the New...
button, then in the New Column dialog box, enter the name and choose type and format of your
field:

- If you do not see your column in your view, you probably are in the Compact view and need to switch to the Single or Preview view.
See also this tip in French: Comment ajouter et supprimer des colonnes.

