Apply or remove cell borders
To apply cell borders:
1. On the Home tab, in the Font group, click the arrow next to Borders:

Then choose a border style from the palette:

Click Line Color
![]() and then click the color that you want to use. Click the arrow next to Line Style
and then click the color that you want to use. Click the arrow next to Line Style
![]() and choose the style that you want to use:
and choose the style that you want to use:

If you want to use another style of borders, choose the More Borders... button to open the Format Cells dialog box:

Click the line style and color that you want, and then click one or more buttons to indicate the border placement.
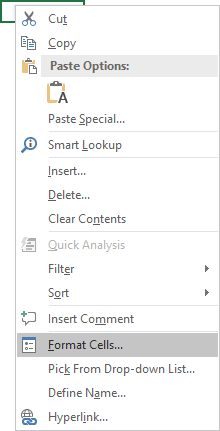
2. Choose Format Cells... from the popup menu to open the Format Cells dialog box:

Click the line style and color that you want, and then click one or more buttons to indicate the border placement.
Note: You also can use the next shortcut keys:
Alt+P Apply or remove the top border.
Alt+B Apply or remove the bottom border.
Alt+L Apply or remove the left border.
Alt+R Apply or remove the right border.
Alt+H If cells in multiple rows are selected, apply or remove the horizontal divider.
Alt+V If cells in multiple columns are selected, apply or remove the vertical divider.
Alt+D Apply or remove the downward diagonal border.
Alt+U Apply or remove the upward diagonal border.
To remove cell borders:
1. On the Home tab, in the Font group, click the arrow
next to Borders and choose Erase Border
![]() and then do one of the following:
and then do one of the following:
- To remove a single border, click that border with the eraser tool.
- To remove more than one border, drag the eraser tool across the borders that you want to remove.
To stop erasing borders, click Erase Border on the Borders toolbar again, so that the eraser tool is no longer displayed.
2. Choose Format Cells... from the popup menu to open the Format Cells dialog box. Click one or more buttons to unselect the border placement.
Note: You also can use the next shortcut keys:
Ctrl+Shift+_ Border lines off
Ctrl+Shift+& Border lines on
See also this tip in French: Appliquer ou supprimer des bordures de cellules.

